These two dates gave us quite good sky up here in the North of Germany. So as I did not image Saturn in this winter season I wanted to give my new INTES MK67 (150mm/1800mm f12) a chance.
Some words on the collimation of the MK67
After I purchased the MK67 from P Bresseler, a renown amateur astronomer, in December 2006 I found some severe misalignment. This probably happened on the transportation. I searched and found a number of descriptions of HOW-TO align and collimate this scope. I also puchased a Laser collimator to adjusted the secondary mirror. Adjusting the secondary mirror was an easy task - but how to collimate the main mirror ? I spent several evenings outside trying to adjust this mirror, but with no success at all. At least I came to two conclusions: The MK67 is defective OR I am doing something wrong. I had followed the descriptions with adjusting the secondary with the laser first and the carefully adjusting the main mirror. This never ended in a good condition. So I tried to do it the other way around:
1: Adjust the secondary with the Laser collimator carefully.
2: Remove the laser and point the scope into the daylight sky (not into the sun of course!)
3: Look into the scope from a bit more distance. Find your watching eye reflected CENTERED in the middle the secondary mirror. You should see now the light baffle (Blendrohr) reflected as a small black ring exactly centered.
4: IF this is not the case, i.e. it does not appear centered, adjust the main mirror with the 6 adjustment screws on the back of the scope. CAREFULLY. I have done this again and again. But the whole procedure lasted only about 10 minutes or so. I have an old eyepiece without any glass inside giving a 6mm hole. So I am sure to be quite centered.
5: Done so, wait for the first stars to appear. The MK67 had a lot of time to cool down.
6: Take an eyepiece 20mm or so and center on a bright mag 1 star. No diagonal (Zenithspiegel) please !
7: Now defocus slightly and you will see the diffraction rings - hopefully - centered. Mine was not centered, but after the procedure described above, already MUCH better than before.
8: Hold your hand from one side in front of the tube and place it where the rings tend to. This is the direction of the screw you have to turn to adjust the SECONDARY (YES).
9: With a few careful movements and with always recentering the star it is possible to get a good collimation within minutes. I even could not believe how easy this was.
10: Change to a higher power eyepiece - I used a 4mm Vixen LV. Go close to focus. I had only a minimal correction to do.
11: After having done this I looked to Saturn and - WOW - what a difference to the day before. Avery easy Cassini division and a lot of details in the atmosphere became visible. So quickly setup my webcam imaging system and here are my results despite some poor seeing that evening.
... I could not resist and give the StellarVue NightHawk a chance. Not too bad for a 80mm scope.
Saturn with collimated MK67
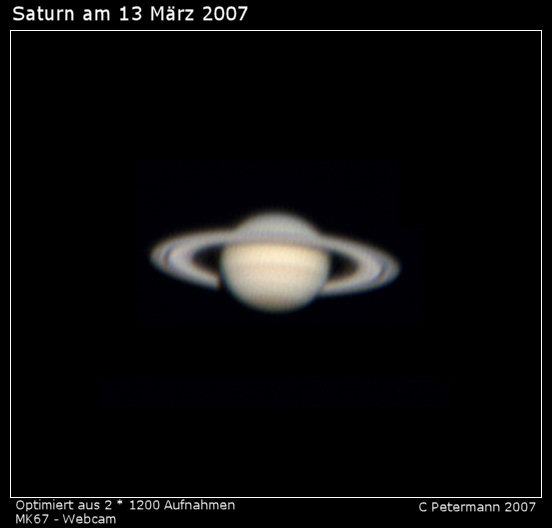
INTES MK67 150mm/1800mm f12 + 25mm eyepiece projection and ToUcam Pro
13 March 2007 20.15 CET / Best of 2 * 1200 images
Processed with ImagesPlus 2.82 and PaintShopPro 9.01
Saturn with an uncollimated MK67
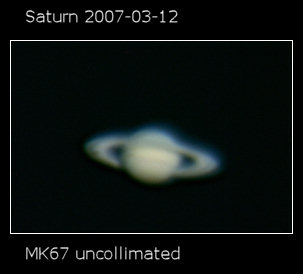
INTES MK67 150mm/1800mm f12 + 25mm eyepiece projection and ToUcam Pro
12 March 2007 20.30 CET / Best of 1200 images
Processed with ImagesPlus 2.82 and PaintShopPro 9.01
Saturn with the NightHawk Refractor

NightHawk 80/480mm + 25mm eyepiece projection and ToUcam Pro
12 March 2007 21.10 CET / Best of 600 images
Processed with ImagesPlus 2.82 and PaintShopPro 9.01