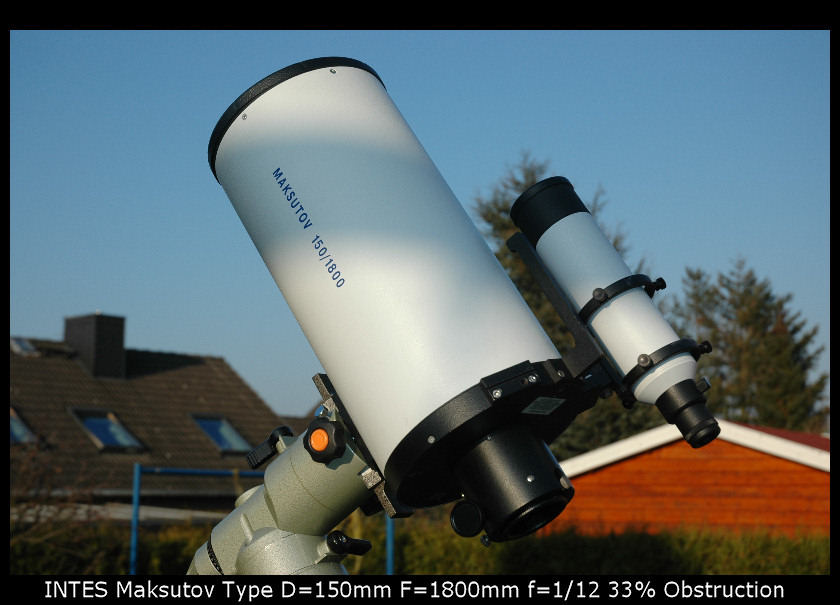
INTES MK-67 Maksutov Type
High Quality System which I use for planetary and lunar imaging.
Etwas zur Kollimation des INTES Maksutov MK-67 (MK67)
Nachdem ich das Teleskop im Dezember 2006 gebraucht erworben hatte, musste ich allerdings nach dem ersten Ausprobieren feststellen, dass die Kollimation ein ordentliche Stück daneben lag. Obwohl es wirklich gut eingepackt hier ankam, wird es wohl auf dem Transport etwas gelitten haben. Im Internet finden sich einige wenige Anleitungen zur Kollimation eines Maksutov, die ich dann eingehend studiert habe. Schnell habe ich mir noch einen Laser Kollimator besorgt, mit dem dann der Fangspiegel effizient ausgerichtet werden konnte. Das war einfach - aber wie den Hauptspiegel ausrichten ??? Ich verbrachte Anfang 2007 einige Abende draussen, um den Hauptspiegel einzustellen. Ich kam zu zwei Ergebnissen: Entweder ist das MK67 kaputt oder ich mache etwas völlig falsch. Ich war den Beschreibungen gefolgt und hatte erst den Fangspiegel und dann versucht den Hauptspiegel am Stern vorsichtig einzustellen. Damit kam ich aber nicht in einen irgendwie brauchbaren Zustand.
Vielleicht sollte es ja anders herum gehen. Und es ging und das WIE beschreibe ich mal hier:
- Richte den Fangspiegel mit den drei Schrauben anhand des Laser Kollimators präzise aus.
- Nimm den Laser heraus und richte das Scope in den Tageshimmel. (Nicht in die Sonne)
- Schaue von etwas weiter entfernt in den Okularauszug. Du siehst dein beobachtendes Auge reflektiert ZENTRIERT im Fangspiegel. Jetzt solltest Du das Blendrohr als feinen dunklen Ring exakt Zentriert aussen um dein Auge am Rand des Fangspiegels sehen.
- Tut er das nicht, also erscheint der dieser Ring nicht zentriert, richte den Hauptspiegel mit den 6 Schrauben ein.(Je eine Zug und eine Druckschraube) Mache das VORSICHTIG. Ich habe das immer wieder gemacht und zum Schluß habe ich noch ein altes Okular OHNE Optik mit einem 6mm Loch zur Kontrolle genommen und ich fand, dass es jetzt sehr gut aussah.
- So, jetzt warte, bis der erste Stern auftaucht. Da hat das MK67 viel Zeit zum Abkühlen ...
- Nimm ein 20mm Okular und zentriere einen 1mag Stern. (Ohne Zenithspiegel bitte)
- Jetzt solltest Du schöne zentrische Beugungsringe intra- und extrafokal sehen. Bei mir waren sie noch nicht ganz bilderbuchmäßig aber fast.
- Wenn Du jetzt die Hand vor das Teleskop hältst, kannst Du erkennen in welche Richtung sich der Restfehler bewegt. Nimm den Dreher und verstelle die entsprechende Schraube. AM FANGSPIEGEL BITTE ! Beim C8 gehts auch nicht anders.
- Mit ein paar wenigen kleinen Korrekturen innerhalb weniger Minuten war es gemacht. Kaum zu glauben, wie einfach das war. Natürlich musst Du immer wieder den Stern zentrieren.
- Jetzt noch ein Okular für höhere Vergrößerung her. Ich habe ein Vixen LV 4mm. Aber da hatte ich nur noch eine geringe Korrektur zu machen.
- Ich gehe mit meinen Instrumenten hoffnungsweise sorgfältig um und so sind auch nach vielen Wochen nach der Kollimation wie oben beschrieben keine Korrekturen notwendig geworden.
Wenn die Gelegenheit da ist, werde ich mal diese Beschreibung um ein paar Bilder erweitern.
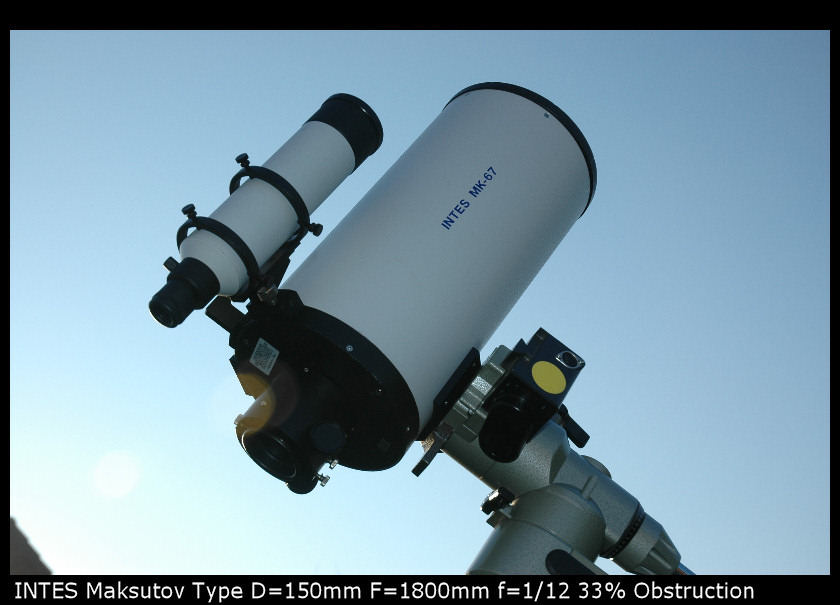
INTES MK-67 Maksutov Type
High Quality System which I use for planetary and lunar imaging.
Some words on the collimation of the MK67
After I purchased the used MK67 in December 2006 I found some severe misalignment. This probably happened on the transportation. I searched and found a number of descriptions of HOW-TO align and collimate this scope. I also puchased a Laser collimator to adjusted the secondary mirror. Adjusting the secondary mirror was an easy task - but how to collimate the main mirror ? I spent several evenings outside trying to adjust this mirror, but with no success at all. At least I came to two conclusions: The MK67 is defective OR I am doing something wrong. I had followed the descriptions with adjusting the secondary with the laser first and the carefully adjusting the main mirror. This never ended in a good condition. So I tried to do it the other way around:
- Adjust the secondary with the Laser collimator carefully.
- Remove the laser and point the scope into the daylight sky (not into the sun of course!)
- Look into the scope from a bit more distance. Find your watching eye reflected CENTERED in the middle the secondary mirror. You should see now the light baffle (Blendrohr) reflected as a small black ring exactly centered.
- IF this is not the case, i.e. it does not appear centered, adjust the main mirror with the 6 adjustment screws on the back of the scope. CAREFULLY. I have done this again and again. But the whole procedure lasted only about 10 minutes or so. I have an old eyepiece without any glass inside giving a 6mm hole. So I am sure to be quite centered.
- Done so, wait for the first stars to appear. The MK67 had a lot of time to cool down.
- Take an eyepiece 20mm or so and center on a bright mag 1 star. No diagonal (Zenithspiegel) please !
- Now defocus slightly and you will see the diffraction rings - hopefully - centered. Mine was not centered, but after the procedure described above, already MUCH better than before.
- Hold your hand from one side in front of the tube and place it where the rings tend to. This is the direction of the screw you have to turn to adjust the SECONDARY (YES).
- With a few careful movements and with always recentering the star it is possible to get a good collimation within minutes. I even could not believe how easy this was.
- Change to a higher power eyepiece - I used a 4mm Vixen LV. Go close to focus. I had only a minimal correction to do.
- After having done this I looked to Saturn and - WOW - what a difference to the day before. Avery easy Cassini division and a lot of details in the atmosphere became visible.